Adding tables and fields
Adding tables and fields
When working through the steps below, you might like to flip between management view and data list view. To do this, use the two selector buttons in the toolbar that look like this:

So to start: in a database, information is stored in tables. To be able to store data, create a table and add some fields as follows:
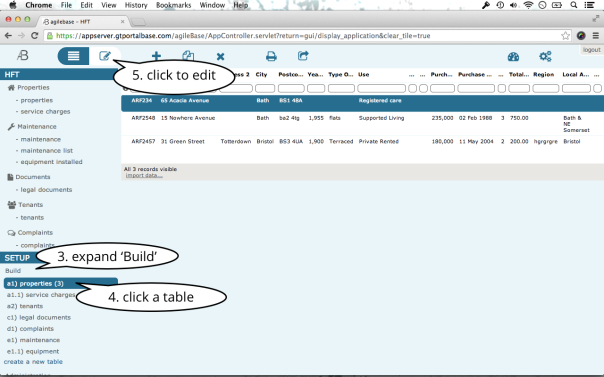
- Create the new table
- Click on the ‘Build’ section in pane 1 (the left of the screen) to open it up
- Click the ‘create a new table’ link and wait a second for the table to be made
- To call the table something of your choice, click the Manage tab at the bottom right of the screen and type in a new name, e.g. ‘stock prices’. The name will update as you type
- Next, set up some fields (see screenshots below)
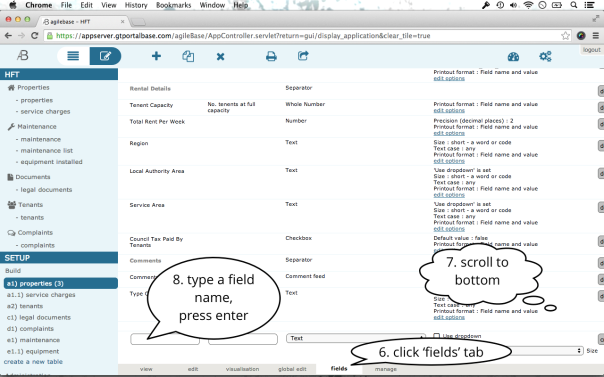
- Click the Fields tab just to the left of the Manage tab.
- Type in a name for the first field, e.g. ‘company’ and choose a type from those given, e.g. ‘Text’. A description is optional. There are some field options listed which you can choose but don’t worry about those for now. Click the Create Field button and your field will be added
- Add another couple of fields, e.g. Stock code and stock price, which would be a number
- When happy with the list of fields, you can start adding data
- Click the Edit tab at the bottom of the screen, then click the plus button at the top left of the screen to add a new record.
- Type away in the edit tab and data will be saved as you go. You should see it being saved in pane 2. Click the New button again to add more records
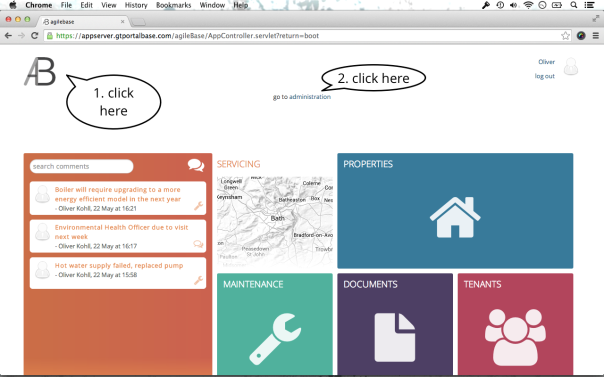
That’s it, you’ve started using a simple table. You could now set up other users and give them access to it using the Administration section in pane 1, or look at creating more complex structures.
Graphical view of adding a field
Before an end user accesses the data, it’s recommended that an ‘application’ look and feel is set up using modules and reports – these will let users interact with the system using the user friendly tiles interface.
Advanced Options
You can set advanced options on fields using the ‘edit options’ link next to each one. For example, for a text field you can set it to enforce a particular text case, change the size of the data entry box, turn it it I to a dropdown, use tags or set it to be used as the record title.
Required and Recommended fields
agileBase has for a long time had the ability to mark fields as ‘recommended’ i.e. when a record is displayed, if any recommended field isn’t filled in, a conspicuous red block draws attention to it on the screen.
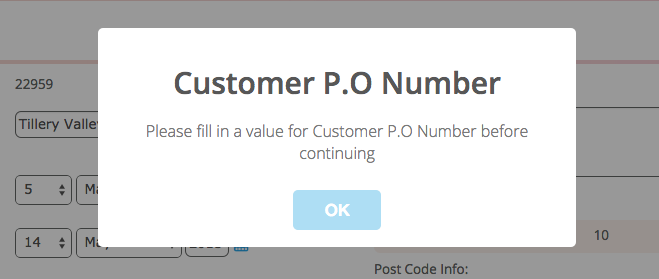
A new feature released today adds a further option to make fields ‘required’. When this is selected, the user won’t be able to leave the editing screen until they’ve supplied the information. Instead they’ll get a prompt asking them to complete it.
The first ‘recommended’ type is called soft validation i.e. the user is prompted to complete but is not forced to. The second is called hard validation, where the user can’t return to other tasks without resolving the issue.
To turn on the required option in the admin interface, go to the table (under ‘build’), select a record and press ‘fields’. Then click ‘field options’ next to the required field and tick the ‘required’ box.
To start with, this option only works with plain text fields but other field types such as dates and dropdowns are soon to follow.
Feedback
Was this page helpful?
Glad to hear it! Please tell us how we can improve.
Sorry to hear that. Please tell us how we can improve.